Showing posts with label guest blog. Show all posts

Mar 12, 2012

GUEST POST: Mandy from MandysSecrets

Hey everyone!  Many thanks to Christina for being kind enough to let me invade her blog AGAIN!  Although she gave me very strict instructions that I'm just here for a visit and not to redecorate the whole place in her absence.  (Yes, I may, or may not, have planned to turn her whole blog pink and Hello Kitty themed...) [NOTE FROM CHRISTINA: Mandy, this would not have gone over very well, let me tell you...ha]

**Ahem**  Anyways, today I have a very fun nail post for you!  I've recently fallen in love with this website called Design Seeds.  Basically, 1-2 color palettes are uploaded for you to glean inspiration from, and while I think they're fantastic for finding new color schemes for your home decor or blog, I'm ecstatic over the color blocking nail polish.

The palette I used this time is Sugared (neon), which is pictured above.  I've always had a thing for Pop Ices and I thought the colors were very bright and appropriate for spring.  Here's what I came up with:


 NOTE: I decided to use a more cerulean-based light blue instead of the bright turquoise shown in the palette because it's what I say when I actually looked at the picture.  I think it could really go either way, but...I like my way best (of course.)

Polishes used:
  • Color Club Almost Famous (yellow)
  • Ulta Blue Streak and Color Club Chelsea Girl (bright blue)
  • Pure Ice Wild Thing and Sinful Colors Irish Green (bright green)
  • Color Club Pucci-licious (purple)
  • Sinful Colors Paradise (light blue
I hope you've enjoyed my post!  Design Seeds is a seriously cool website and I think you can get a lot of inspiration from it.  Be sure to check it out if you have time!

I'd like to thank Christina again for having me over to visit today.  Her blog is seriously one that I read religiously, so it's an honor that she asked me to post for her!

Thanks again Mandy for your awesome post!  Be sure to look at Mandy's blog at MandysSecrets 

Mar 8, 2012

GUEST POST: Laura from Applied Glamour

 Just how fabulous and gorgeous is Debbie Harry?  She spent the late 1970s singing catchy, infectious tunes like "Heart of Glass" and "One Way or Another" with her band, Blondie, at New York's legendary CBGB's...when she wasn't hanging out at Andy Warhol's Factory, dancing up a storm at Studio 54 and becoming world famous, that is.  Her bleach blond hair endeared her to the punk scene while her band's dance-worthy synthesized songs were popular with the new wave crowds, ensuring her mass popularity.  Beyond the stage and dance floor, Debbie Harry appeared in music videos and on magazine covers with unassailable rock star coolness and colorful makeup that every girl wanted to emulate.


 Her signature blushing cheeks, heavy eyeliner, candy shop eyeshadow and glossy lips are just as popular now as they were then!  Here's how to create your own Debbie Harry inspired makeup look.  I imagine a rock star on tour won't have a lot of room in her makeup bag for a bunch of single products, so load up on palettes!

Kat Von D True Romance Eyeshadow Palette in Mi Vida Loca, $36: Almost every color of the rainbow is in this gorgeous eyeshadow palette!  It's perfect for recreating Debbie's signature candy colored eyelids.  Go especially crazy experimenting with pink, blue, and purple, her favorite shades to wear.

Tarina Tarantino Dollskin Cheek Palette, $45: Our Debbie is also a fan of blushing, sculpted cheeks and this palette gives a nice variety of different shades depending on the look you want.  Plus, the bright pinks can double as eyeshadow when needed!

Smashbox Cream Eyeliner Palette, $32: Black eyeliner is essential but sometimes other colors are also necessary.  This cream liner palette includes every shade you could want in your beauty arsenal, including neutral brown, smoky silver, inky blue and royal violet.

Exude Lipstick in Red and Coral, $30: Another signature look of Debbie's is her glossy lips.  Exude is a liquid, glossy lipstick with a plastic tip applicator that never wears down!  It won't melt if you accidentally leave it on your tour bus in the summer.  I think Debbie would be partial to these shades in particular, don't you?

Pixi Succulent Lip Twin in Pink Peony, $18: A stunning shade of pink liquid lipstick (think "Heart of Glass" video) with a matching pink tinted lip balm attached makes for two perfect products in one.

Rimmel Soft Kohl Kajal Eye Pencil in Jet Black, $4: A rock star can never have too many black eye pencils, am I right?  This one is kohl inspired and the deepest, darkest shade of black.

L'Oreal Paris Voluminous Smoldering Eyeliner in Black, $8: This formula is great for smudging and creating a smoky eye.  Oh so essential for a rack star.

Check out more of Laura's fabulous writing and amazing posts at her blog, Applied Glamour.  Thanks again Laura for your awesome guest post!!

Feb 28, 2012

Interview with a Makeup Artist

I'm so fortunate to have the friends I do especially when they're either makeup artists or hair stylists!  My fabulous friend, Ariella (who featured on my blog HERE and HERE and HERE) is not only a makeup artist but, now, a registered holistic nutritionist.  YAY for me!!  Anyway, check out a Q&A with the lovely lady:

1) How did you first get into makeup artistry?
I knew I wanted to pursue art but wanted to make sure I could make a living at it so I thought working in TV & film was my best bet.

2) What is your favorite style of makeup to do on others?
I love doing special FX makeup but since I mainly do weddings now, creating a "natural glow" is something I love.

3) What are your favorite cosmetics?
I can honestly say I don't have one brand that I'm loyal to.  There are usually 2 or 3 products from many different lines that I gravitate towards.  For example, my current faves are Tarte Foundations, Benefit Highlighters, MAC Eye Primer, Laura Mercier Face Primer and Stila Eye Shadows.

4) What is the hardest thing (makeup-wise) you've ever learned to do?
I turned a past boyfriend into a blue alien.  Let me say that it was no cake walk!  Airbrushing full bodies is very challenging because unlike a face or a canvas, you must consider every individual angle and a person's movements.

5) Is wearing primer necessary?
It depends completely on your skin type and lifestyle.  If you're a person that applies makeup at 7 AM and needs it to last through the evening then, yes, invest in a good primer.  I see too many women with creased eye makeup and want to run after them holding eyeshadow primer!  Also, if you have blemished skin, I also suggest using a face primer to protect and even out skin tone.  Although a good primer is an investment, your foundation will last longer as a result.  Laura Mercier and Smashbox make fantastic primers.

6) What is the proper way to apply concealer?  Foundation?  Powder?
I find that applying foundation first, then concealer and, finally, powder (powder seals the liquid makeup) to be the most lasting method.  Concealer should be pressed into the face NOT swiped which just moves the makeup around the face.  Press it in with a brush or your fingertip.  Also, press the powder into your face, similar to concealer (try using a makeup sponge) as swiping it will case the makeup to move around and look blotchy.

7) Any special tips you can share?
Experiment and practice!  Makeup is supposed to be a fun way of expressing yourself, like fashion.  Try something new and have fun!  It doesn't need to be the same thing everyday.


8) What's the best way to cover acne scaring?  Pimples?  Blackheads?
The best way to deal with acne or blemishes is to let your skin breathe.  (In other words, don't cover your skin all the time.)  Address the problem and ensure you're taking your makeup off every night.  Also, moisturize your skin!  Often oily skin, which leads to blemishes, is a result of lack of moisture which makes your body overcompensate.  Another tip is to try wearing a foundation with clay in it (like Tarte) which helps control oil throughout the day.  If you're very red in skin tone mix a little green corrector into your foundation which will help even out the complexion.

9) How do you create a smoky eye with as few steps as possible?
3 colors, that's all you need!  1) Medium, all-over color.  2) Feature color, darkest one.  3) Highlighter, for eyebrow and corner of the eye.  Take your first color and apply it all over your eyelid and below the bottom lashes.  Take your feature color and SLOWLY add it on top and into your lash line.  (This can be as bold or as subtle as you'd like.)  Remember, you can always add more color and it's much more difficult to take it off once applied so take your time.  Add the highlighter last and throw on some liner if you want.  (adds a bit more drama to the look.)  Voila, a smoky eye.  I personally love doing smoky eyes in different colors like brown, maroon, purple or navy blue!

10) Any secrets of the trade you want to share?
Choose one facial feature to focus on and the rest should be complimentary.  Either your eyes, lips, cheeks but not everything at once.  Invest in a couple of great brushes as they are the backbone of any great look.  Another good investment is foundation in a pump or squeeze bottle; bacteria stays away for longer and you can control how much product you want to use.

Whew, lots of questions.  Thanks Christina for asking me to chat!!

Note from Christina - Ariella attended Blanche McDonald Professional Makeup School and, after finishing the program, started working on many independent films as a makeup artist.  She left the film industry, quite some time later, to pursue other career passions (such as holistic nutrition.)  She mainly focuses on weddings (yes, she's doing my makeup for my wedding) and photo shoots in the Vancouver area.  She has a passion for eco-friendly makeup and making women feel like the best version of themselves.  She loves helping people feel effortless in their makeup (not like they're wearing face paint) though she does enjoy making a mean dead body once in a while!!  Ha

Nov 30, 2011

GUEST POST: Top 5 Celebrity Beauty Secrets from Louise at Feelgood Style

**Louise Ryan from the blog Feelgood Style sent me a fabulous article and I knew I HAD to share it with you all.  So, without further adieu...Here are the Top 5 Celebrity Beauty Secrets as written by Louise!**

Hollywood is alive with budding actors and movie stars all looking their best – but how do they stay so glamorous? Of course many celebs opt for boob jobs and Botox, but here are 5 more Hollywood beauty secrets:
1.  Lash extensions
Eyelash extensions have become incredibly popular of late and are adored by the stars. They’ve become a must-have and help make lashes thicker, fuller and more beautiful. They’re made from silk, mink or synthetic materials and are designed to match your existing eyelash colour. They come in numerous different textures and are applied to natural lashes using a special bonding agent.  Katy Perry and Victoria Beckham are believed to be fans as are Nicole Kidman, Lindsay Lohan and Gwen Steffani

2.  Microdermabrasion
Microdermabrasion is a non-surgical procedure that’s popular with the rich and famous. Tiny abrasives work to polish the skin and reveal a soft, smooth and rejuvenated complexion. Blemishes, wrinkles and fine lines are removed and frequent treatments improve sagging or severely scarred skin. The whole process is pain free and any redness fades quickly meaning celebs are ready for the red carpet in no time – what could be better? 
3.  Detox package
Many celebrities opt for a detox package before a big event to help revitalise and replenish their skin. They enjoy a specialised seaweed treatment which helps rid their body of toxins before clearing their pores in a sauna. They then book in for a massage to stimulate their circulation before detoxing their body with water and green tea.
4.  Egyptian Magic
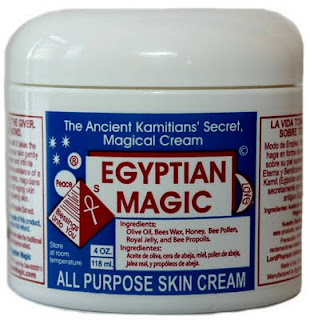
A host of well-known stars can’t get enough of Egyptian Magic, an all-purpose, healing skin-cream that’s meant to heal scars, relieve skin ailments and nourish hair. Made from olive oil, beeswax, honey and royal jelly this sough after product is even designed to soothe sunburn and helps get rid of rashes. Kate Hudson reportedly said “I slather this all over my face on overnight flights to keep my skin hydrated” and supermodel Gisele Bundchen is also a fan.

5.  Heels and lipstick
It might sound a bit Desperate Housewives, but many celebrities rely on heels and lipstick to feel glamorous. Strictly Come Dancing presenter Tess Daly reportedly throws on a pair of stilettoes to do the school run and feels more attractive in an instant. Many working mums devise tricks to look fabulous and even celebs need a confidence boost now and again.

So there you have it, 5 Hollywood beauty secrets that can help you feel great in no time. 

PS - Thanks again, Louise, for your awesome post.  Check out her BLOG, ladies, if you haven't done so already!

Nov 24, 2011

My Interview With Laura From Applied Glamour

Photo courtesy of Applied Glamour 
My fabulous blog pal, and fellow beauty junkie, Laura from Applied Glamour sent me some questions to answer for a guest spot she's hosting on her amazing blog..

And let me tell you, some of those questions were VERY hard to respond to!!

Click HERE and find out which hard questions she asked AND which ones I found difficult to answer.

Thanks again, Laura, for featuring me on Applied Glamour and I hope you'll do a guest post for me very soon!

Oct 4, 2011

GUEST POST: Kristi's Adventure With Clinton Kelly (Yes, From What Not To Wear)

I adore the fashion advice and product reviews on the Red Lip Gloss blog written by the fun and feisty Christina, so when she invited me to write a guest post, I felt honoured.  As a fellow style and fashion junkie, I am excited to share some of what I learned from the master of style himself, Clinton Kelly. I was fortunate enough to spend an entire day with him in Toronto when I won a spot on a makeover show.  (If you are interested in watching the segment, log on to www.marilyn.ca and search the archive folder for the March 4th episode. I’m the one right beside Clinton below.)


With that said, here are five tips and tricks I learned from the master of style himself:

Get fitted for a BRA:  The bra you wear day to day is not the bra you wear with your boyfriend /husband in bed for a little nookie!   Trust me, when you have the right fitting bra, it makes a world of difference not only in how you feel, but in how you look.  Back fat bulges disappear and a lean and slim waist appears as if by magic.  Trust me, it’s a beautiful thing!  Take the time, spend the money and get yourself a fitted, then BUY the bra they recommend for you.  The Bay is a great place to get this done for free, and they have an abundance of pretty, yet functional bras to choose from.  Our bodies change all the time, so have a bra fitting every year to ensure you maintain the proper fit. 

High heels with RUBBER soles:   I had no idea they were available but they are and they're WONDERFUL!  My most comfortable boots are a pair of 4 inch suede wedges that I wear like running shoes and I also have a pair of 4 inch metallic snake skin pumps that I can walk in all day and not feel a thing.  They tend to be a little more expensive, but well worth the money. Try a major department store when looking for rubber soles as they have many brands to choose from.  I will never go back now that I have rubber soles!   

Fit, fit, fit:  Clothes that are purchased off the rack are intended to fit the majority of people of that size.  They are not intended to fit YOU perfectly, so they need to be altered.  Again, this is something you will want to spend the time and money on as it makes your clothes go from ordinary to extraordinary and is another way to visually drop 10 pounds without ever setting foot in a gym. 

 The two x two rule:  (Not my closet!) The rule states that before you purchase ANYTHING you must determine if the piece can be used for more than two reasons (i.e. work and going out, or casual lunch and work) and already matches with two other pieces in your closet.  If the piece cannot be used for more than two functions, do NOT buy it.  If it does not match two other items you already own, do NOT buy it.  This eliminates items that are only worn once or twice a year or only as an “outfit”.  You will own fewer pieces but have more choices.  Set aside an afternoon or evening and take everything out of your closet.  If you have not worn the piece in a year, donate it to charity. If the piece does not make you feel FABULOUS, get rid of it.  Why would we ever want to put something on our bodies that does not make us feel like the gorgeous creatures we are!?? Once you have “edited” your clothes, start determining which colors look best on you and donate the ones that don’t do anything for you.  You will be shocked at how little you have left at this point! I certainly was!!  My closet is only half full and I feel like I have twice as many options.  

Accessories:  The final tip I learned from Clinton Kelly on the Marilyn Denis show was how to accessorize.  I have two small children (aged 2 and 4) and am not one to throw on a big pair of earrings (that will be torn out of my ears!) or a long necklace that little hands will break off my neck.  However, I have learned that to instantly glam up an outfit, throwing on a few easy and inexpensive accessories makes a world of difference.  Don’t over-do accessories; it can make you look cheap!  Make your statement with EITHER the necklace OR the earrings, but not both.  I recently met a friend for dinner and we both said we would not dress up as we were tired (the Mom’s anthem!).    With that in mind I threw on a pair of jeans and a black tank top with ballet flats. As an after-thought I pulled on the necklace I am wearing in the picture above with Clinton. It’s hard to see in the picture, but it’s big, glittery and gold.  My friend was angry with me for dressing up so I took off the necklace and she laughed, seeing me in my jeans and tank top.  The necklace had literally “made” the outfit.  Quite an eye opener!  What a difference a little glitter can make!  I am now a sworn accessory wearing mom and my kids are learning to keep their hands off!

I hope these tips help you be more fabulous in an easy and convenient way!  If you want to learn more, watch What Not To Wear, Tuesdays on TLC at 8:00 pm.  Good luck with your fall fashion finds and keep reading Red Lip Gloss for more great advice and reviews! 

**Thank you soooo much, Kristi, for the fabulous post.  Not only are your tips amazingly helpful for us all BUT you look phenomenal in your picture above.  Sigh, love it.**

XO Christina 


Sep 29, 2011

Guess What? My Guest Post Is Up On MandysSecrets

Yes, that's right, I was asked to do a guest post and I'm most excited about it because it's my first time EVER!!!  Mandy is a great blogger friend of mine and her blog is one that I read very frequently PLUS she's fabulous at nail art.  Honestly, the girl has mad skills.  So, when she asked me to do a feature, I was super stoked and, of course, said yes!

I chose to do a post on Fall 2011 Beauty Trends because, let's be honest, there are sooooo many great ones this year.  You probably know what I'm going to ask you to do next SO what are you waiting for?  You should go to MandysSecrets and check out my blog post (and her blog) right away.

Have an awesome Thursday ladies!

XO Christina

Sep 26, 2011

GUEST POST: Mandy From MandysSecrets Shares Her Red Lip Gloss Inspired Nails

'Red Lip Gloss' inspired nail art!
 
Hey everyone! I was so incredibly honored when Christina asked me if I would be interested in doing a guest post for her blog. Even though we've only known each other for around six months, she is definitely one of my closest blogging friends and I don't know what I'd do without her. I adore her blog and I'm constantly looking to her for advice and tips. I'm also an unabashed lover of her "DIY Beauty Friday" series!

But enough about how amazing she is.. you already know that. :) My post today is going to be a nail art tutorial for a design inspired by Christina's blog layout. When she asked me to do something nail related, I thought paying homage to her by doing a 'Red Lip Gloss' inspired mani was the perfect idea! 

Now, before I begin, I'd like to preface this with the disclaimer that I'm not a nail blogger. I'm a beauty blogger who dabbles in nail art.. My nails are short and damaged from removing acrylics and my cuticles definitely aren't perfect!

PRODUCTS USED:
Sinful Colors 'Nail Hardener' / China Glaze 'For Audrey' / Sinful Colors 'Snow Me White' / Pure Ice 'Kiss Me  Here' / China Glaze 'Fairy Dust'

'Lipstick Red' Acrylic Paint / 'White' Art Deco Striper / NYC Quick Dry Top Coat /  Clear 1mm Rhinestones / Dotting Tool / Nail Art Brush

HOW I DID IT:


I applied my base coat and allowed it to dry. Then I applied 2 coats of ChG 'For Audrey' to all nails except my right ring finger and thumb. I used 2 coats of Sinful Colors 'Snow Me White' on my ring finger and 2 coats of Pure Ice 'Kiss Me Here' on my right thumb. After my ring finger dried, I applied 1 coat of ChG 'Fairy Dust'.

After my nails had dried, I used my White Art Deco Striper to make the vertical stripes on all of my turquoise nails to replicate Christina's blog background. Then I used 1 coat of top coat on my right ring finger only.. I'll explain why in a minute!

Again taking my White Striper, I used it to plan out where my 'XO' would go. I chose grey for my thumb since the center section of Christina's layout is edged in a dark grey. I decided to put 'XO' on the nail since that's how she signs every post as well as most comments and emails.

To apply the rhinestones, I swiped a layer of top coat over the letters. I applied top coat to one letter at a time, and working quickly, placed my dotting tool in the wet polish so that it would pick up the rhinestones and placed them on the outline of the letters.

Now, remember how I said I applied a layer of top coat to my ring finger? I did this to protect it before I started working on my red lip print. I find it's easier to use acrylic paint for detail work because it dries slower and is generally more forgiving than polish. Another plus to using acrylic paint is that if you make a mistake, you can simply remove it with water before it dries!

I started by drawing the outline of a red football, and then I went back and added the curvature of the top lip and rounded out the bottom. I waited for it to dry, and then applied a layer of top coat to all my nails, paying particular attention to make sure that my rhinestones were completely sealed onto my nail.

And here is the finished design! (Minus the thumb, which you've already seen..) Please excuse the ridiculously long cat hair embedded in my middle finger. One of our cats, Andy, headbutted me before my top coat had dried and I didn't realize he'd donated to my art until it was too late. Oh well..

- - - - - * - - - - -

Well, thank y'all for reading my post! I hope you've enjoyed my nail art tutorial and that maybe it has inspired you to do some nail art of your own.. or maybe even just paint your nails if it's not something you do regularly!

And again, many many thanks go out to Christina for having such a fabulous blog and allowing me the opportunity to contribute to it.

 ****Thanks again, Mandy, for your amazing post!  I certainly wish I was as talented as you are at doing nails.  By the way, check out her blog here.****

XO

Mar 21, 2011

Boscia Acne Skincare - A Guest Blog by Carmen

When a friend is in need of skincare advice, who else to turn to but Christina right? Well that’s what I figured, so when blemishes of gargantuan proportion started surfacing on all parts of my face over a period of about a week, I decided immediate action needed to take place and got on the pipe with the ‘Lady with the Answers’ immediately. It just so happened that she had recently picked up a test set of the basic products from the Boscia Line with a points credit she had at Sephora. (I’m sure she gets a freebee each week with the amount of product she buys haha...) Of course nothing comes free right?.....well actually she is very generous, so of course they do with her, but in this case, the payment requested for using this tester was that I blog about it of course!

I am aware that my recent skin issues are due to hormonal imbalances and changes, and that $1000 products would not necessarily fix this immediately. But I was eager to see what benefits, if any, this new skin care line would offer me. The first day I used the products I noticed the light, non-sticky, pleasant smelling texture to this product line, and instantly loved its look and feel. I received five products, and have recently purchased one more, so here are my thoughts:

Makeup-Breakup Cool Cleansing Oil - My first reaction was surprise since it’s an oil [of course I had not read the title of the product, otherwise I wouldn’t have been surprised!]. Wash with oil? When I already have an oily complexion? Weird.... but I’ll try anything. The first few days I noticed that it did a bang up job of getting all my makeup off, even my eye makeup and was quite impressed that little to no residue was left behind when I did a spot check with toner and a cotton swab. Imagine my surprise when Christina asked me if I was supposed to put it on dry or not...of course I didn’t let on my ignorance to her as I had just assumed one would wet their face first as with normal products. So I went back and re-read the fine print, and sure enough, it says to put on a dry face! Wow, an incredible difference. An already great face wash just became amazing. It almost naturally heats with the friction of your fingers, and removes EVERYTHING on your face. It also leaves ones skin feeling moist and supple. Love this product!

Enlivening Amino AG Eye Treatment - A few months ago Christina put me onto an under eye stick. She told me I was looking haggard and needed some help. (This is a joke; she would never be so rude!!) So I have been faithfully using the Garnier under eye stick since and it works fabulously! However, I decided to trust that the Boscia one would be equally as good and shelved Garnier for the time being. Instead of a liquid, this is a fairly thick, but non greasy cream, that you lightly rub into the sags, bags and dark pouches under and around one’s eyes. I can’t say enough about how immediate the difference was! Even though I had been using a similar product the Bosica product has vastly reduced my bags and darkness leaving my eye zone area looking much more alive.

Oil Free Daily Hydration - I have never in my life been picky about moisturizers or even particularly aware of if they work or not. This one is on the lighter side, has good coverage with a small amount, and doesn’t leave my face greasy feeling at all. I have noticed a small amount of flaking of skin in certain areas of my face, but it could just be the nature of the fact that it’s still winter here, and the wind and colder temperatures tend to dry out certain zones anyways. All in all, this is a nice product – and one that I will continue using.

Skin Perfecting Primer - OH MY! I was in love with this the first time I used it! Thick but not greasy – amazing coverage – and I hardly have to blot the slickness off my face anymore. (This is apparently one of the benefits of using a primer). The mineral makeup I use glides over this primer with amazing ease and my makeup now never cakes or creases. I will swear by this until I die.....well, or until Christina puts me onto the next best thing. But honestly, I actually look forward to putting this on every morning. One thing to be aware of however is that if this product gets too close to your eyes it will sting and make them water. So ensure you close your eyes for a few seconds if that happens and it goes away.

Green Tea Blotting Linens - I have used blotting sheets for years, and had some I love and some I don’t love so much. These are by far my favourite for a few reasons. They are large....one sheet can do my whole face and even have some of the sheet left over. The dispensing system is like a Kleenex box where when you pull one out, another comes out behind it. This is so much better than trying to get your finger or nail behind one paper thin sheet to pull out. The paper is very organic feeling; you can tell it is made from natural materials which makes me feel great about the environment as well. It whisks the shine off my face like no other blotting paper has, and leaves no smell or residue behind.

Clear Complexion Treatment with Botanical Blast - After a few days, I realized that no matter how much I loved the products, my acne was not disappearing as fast as I wanted it to, and I needed to get a spot treatment. I went to Sephora and bought the matching one to the line (kinda pricy....I know I’m in for a hefty bill when my test kit runs out, but it will be worth it). I love the pump dispenser, and its active ingredient is Willow Bark so the scent is light and pleasant. This is an all over, or as needed treatment that can be put under makeup for day, or before bed (or both) to combat the growth of those nasty red things. To begin with, I used it morning and night, and liked how fast it dried on my skin, and how it didn’t leave a crust at all like some topical spot zit zappers do. Now that my skin is clearing, (yes, finally it is!!) I am only using it as needed at night to preserve the product for future breakouts. Since my skin scars incredibly easily, I now have some lingering redness to deal with – perhaps I need to get a green cover stick based on Christina’s love of them as read in a recent post of hers.

All in all, my Boscia testing experience has been a great one, and I have found a new product line that I plan to continue with for the foreseeable future. Christina, I hope this blog suffices as payment, and that we are now even... Any time you want me to be your guinea pig for future products, as one face can only test so much, I'm here!!!


 photo copyright.jpg
envye template.